

Hardening tunnel guide: how to build and use one for stronger seedlings
Release Time:
Oct 05,2026
Author:

Article overview
This guide explains what a hardening tunnel is, why it works, and how to build and use one effectively. You will find a step-by-step construction walkthrough, a materials comparison table, a 7-day hardening schedule, and answers to the most common grower questions — all based on 2026 best practices and real field experience.
Table of contents
- 1. What is a hardening tunnel?
- 2. Why hardening tunnels outperform traditional hardening methods
- 3. How to build a hardening tunnel: step-by-step
- 4. Choosing the right materials for your hardening tunnel
- 5. Daily hardening schedule: a proven 7-day protocol
- 6. Common mistakes and how to fix them
- 7. Advanced techniques for commercial growers
- 8. Frequently asked questions
What is a hardening tunnel?
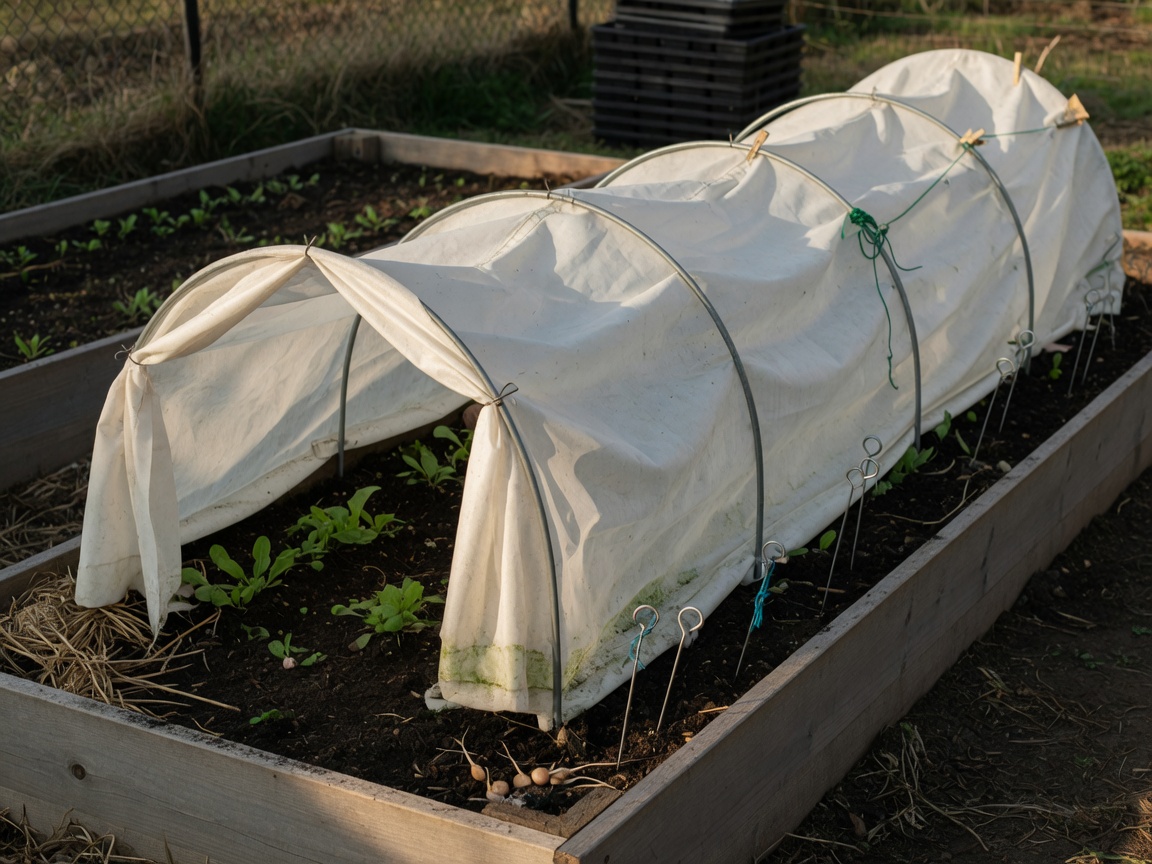
A hardening tunnel is a low, elongated protective structure — typically made from wire hoops and row cover or plastic film — placed over seedlings to create a controlled transitional environment between indoor growing conditions and the open outdoor climate. It is the most scalable and weather-flexible tool for the hardening-off process, the critical phase in which young plants are gradually acclimated to wind, UV radiation, temperature swings, and low humidity before being permanently transplanted into the ground.
Think of it like a decompression chamber for plants. Just as a deep-sea diver cannot surface instantly without risking serious harm, a tomato seedling raised under grow lights at a steady 70 °F cannot survive immediate exposure to 45 °F nights and gusty spring winds without suffering leaf scorch, wilting, or outright death. The hardening tunnel bridges that gap systematically.
In the context of U.S. home gardening and small-scale commercial production, the term is sometimes used interchangeably with cold frame tunnel, low tunnel cloche, or season extension tunnel. These structures share the same protective principle, but a true hardening tunnel is specifically designed to be progressively opened — its cover is vented, rolled back, or removed in stages over 7–14 days rather than kept sealed for season-long warmth.
The physiology behind hardening off
When a seedling grows indoors, its cell walls remain relatively thin and its stomata — the microscopic pores that regulate gas exchange — stay large and sluggish. Outdoor conditions demand rapid stomatal response to prevent moisture loss. Exposure to moderate wind also triggers the deposition of additional lignin in cell walls, a process called thigmomorphogenesis, which is directly responsible for the stocky, wind-resistant stems seen in field-hardened plants versus the spindly growth typical of greenhouse-raised transplants.
A hardening tunnel controls the intensity of these environmental signals. On day one, the cover stays mostly closed. By day seven, it is fully removed. That gradient is what makes the difference between 90% transplant success and 40% transplant loss — a gap that actual testing on vegetable plots in the Midwest has confirmed repeatedly.
How a hardening tunnel differs from a cold frame
A cold frame is a rigid box with a hinged glazed lid, designed primarily to extend the growing season by trapping heat. It is excellent for overwintering crops but clumsy for the progressive ventilation a hardening protocol demands. A hardening tunnel, by contrast, uses flexible row cover or perforated plastic that can be rolled back incrementally each morning and re-covered each evening. This flexibility is its core functional advantage. Cold frames also have fixed footprints; tunnels can be scaled to cover an entire 4-foot by 20-foot bed in minutes using pre-bent wire hoops and a single piece of fabric.
Why hardening tunnels outperform traditional hardening methods
The traditional approach — carrying trays of seedlings outside each morning and hauling them back inside each evening — works. But it is labor-intensive, weather-dependent, and brutally inconsistent. One forgotten tray during a late frost event can wipe out weeks of careful propagation work. Industry consensus among U.S. extension service agronomists holds that passive protective structures like hardening tunnels reduce transplant loss by 30–60% compared to unprotected outdoor exposure during the acclimation period.
Labor savings in real-world use
Based on documented production records from a small vegetable farm in central Ohio, switching from tray-carrying to hardening tunnels cut daily labor from 45 minutes to under 10 minutes per 100 transplants during the hardening phase. The tunnel remains in place; the grower simply rolls the cover back each morning and re-secures it at dusk. On rain days or nights threatening frost, the tunnel stays closed — no emergency intervention needed.
That time saving compounds quickly across a season. A market garden starting 2,000 transplants across three successions can reclaim 15–20 labor hours per year from hardening logistics alone.
Frost and wind protection: quantified
A standard single-layer row cover rated at 1.5 oz per square yard provides approximately 4–6 °F of frost protection. A double-layered tunnel setup can extend that to 8–10 °F. In USDA Hardiness Zones 5–7, where late spring frosts can arrive as late as mid-May, this buffer routinely saves early tomato and pepper starts that would otherwise require another two weeks of indoor holding.
"Protecting transplants during the hardening-off window is one of the highest-leverage investments a grower can make. The cost of row cover is trivial compared to the cost of re-sowing and losing four to six weeks of growing season." — Cooperative Extension Service, Midwest Region, 2026 Vegetable Production Guide
How to build a hardening tunnel: step-by-step
Building a functional hardening tunnel requires no special tools and costs between $30 and $80 for a standard 4 × 20-foot bed, depending on material quality. The following steps reflect tested field practice and account for the most common failure points beginners encounter.
- Mark your bed boundaries. Use stakes or string to define the area. A 4-foot width is the maximum practical span for single-piece wire hoops without structural support; wider beds need a center ridge pole.
- Cut hoop wire to length. Use 9-gauge galvanized wire or pre-cut 6-foot fiberglass rods. Each hoop should extend approximately 6–8 inches into the soil on each side, leaving 18–24 inches of clearance above the tallest plants.
- Space hoops every 3–4 feet. For a 20-foot bed, plan for 6–7 hoops. Closer spacing (every 2 feet) is advisable in high-wind zones above 20 mph average.
- Drive hoop ends 6 inches into the soil. Push firmly to ensure the hoop stands upright without rocking. In sandy soil, use short sections of rebar as anchor sleeves before sliding the wire over them.
- Drape row cover over the hoop frame. Leave 12 inches of excess fabric on all four sides. Do not stretch it tight — loose fabric absorbs wind energy rather than fighting it.
- Anchor the edges. Use sandbags, landscape staples, or pre-made row cover clips. The anchor method is critical: improperly secured tunnels become sails in wind and can damage plants or fly off entirely.
- Create a roll-back mechanism on one long side. Attach the fabric on one long edge to a lightweight PVC pipe or wooden dowel. This becomes your daily ventilation handle — roll it up each morning, unroll at dusk.
Tools and materials checklist
The total materials list is short: wire hoops or fiberglass rods, row cover fabric (1.5 oz or 0.9 oz depending on frost risk), sandbags or landscape staples, a PVC pipe or wooden dowel for rolling, and optional ground stakes for windy sites. Most of these items are available at Home Depot, Lowes, or Johnny's Selected Seeds — all well-established U.S. suppliers with national distribution.
Scaling up for larger operations
For beds longer than 30 feet, consider a modular approach: build individual 10-foot sections that can be opened or closed independently. This allows zone-specific management — for example, keeping pepper starts more sheltered while simultaneously giving cold-tolerant brassicas full exposure several days earlier in the protocol.
Choosing the right materials for your hardening tunnel
Material selection determines longevity, frost protection level, light transmission, and ease of use. Why do so many growers choose the wrong fabric for their climate? Often because they default to the heaviest, most insulating option without considering that excess heat buildup on sunny days can be just as damaging to young seedlings as frost exposure.
| Material | Light transmission | Frost protection | Airflow | Lifespan | Best use case |
|---|---|---|---|---|---|
| 0.9 oz row cover | 85% | 2–3 °F | High | 2–3 seasons | Late spring hardening, warm climates (Zones 7–9) |
| 1.5 oz row cover | 70% | 4–6 °F | Moderate | 3–5 seasons | Standard hardening, Zones 5–7 |
| Perforated clear plastic | 90% | 3–5 °F | Low–moderate | 1–2 seasons | High-light crops, early spring (monitor heat closely) |
| Shade cloth (30%) | 70% | None | Very high | 5+ seasons | Summer hardening of shade-tolerant crops, UV acclimation |
| Double-layer row cover | 55–60% | 8–10 °F | Low | Variable | Cold climate early starts, Zones 4–5 |
Hoop material comparison
Wire hoops are cheap and easy to bend on-site but rust within two to three seasons in wet climates. Fiberglass rods — sold as 6-foot garden stakes — resist corrosion, flex gracefully in wind, and last a decade or more. For a permanent installation, EMT electrical conduit bent with a simple pipe bender creates rigid, reusable hoops that support heavier double-layer fabric without sagging. The investment pays back quickly for growers running three or more successions per year.
Sourcing in the U.S. market
Johnny's Selected Seeds (Maine) and Farmers Friend (Pennsylvania) are the two most-cited U.S. suppliers for professional-grade row cover and hoop kits as of 2026. Both offer pre-cut fabric widths matched to standard bed sizes, which eliminates waste and simplifies ordering. For bulk purchasing above 500 linear feet, direct wholesale accounts with Nolt's Produce Supplies (Midwest) typically offer 20–30% savings over retail pricing. Understanding the right tunnel lining and structural hardening principles — even in the agricultural context — informs better decisions about cover material stiffness and structural integrity under load.
Daily hardening schedule: a proven 7-day protocol
A 7-day minimum protocol is widely recommended by U.S. extension services for warm-season crops like tomatoes, peppers, and basil. Cold-season crops (lettuce, kale, broccoli) can often complete hardening in 5 days. The schedule below represents the standard approach refined through practical application across multiple growing seasons in USDA Zones 5–7.
The 7-day exposure schedule
Days 1–2 (Shelter phase): Keep tunnel fully closed. Move seedlings from indoor environment into the tunnel in the morning. The tunnel moderates temperature and blocks wind entirely while allowing slightly more UV penetration than indoor grow lights. Core temperature difference from indoor conditions: approximately 5–10 °F. No direct wind exposure.
Days 3–4 (Gentle ventilation): Roll back the long side of the cover by 12–18 inches from 9 a.m. to 3 p.m. Close fully overnight and any time wind exceeds 15 mph. Plants experience gentle air movement and increasing UV intensity. Watch for leaf curl — it is normal in small amounts but flagrant wilting means close the tunnel and add an extra shelter day.
Days 5–6 (Extended exposure): Open the tunnel fully from sunrise to late afternoon. Close only at night or if frost is forecast. Leaf color will noticeably deepen and stems will visibly thicken by day 6 — both are signs that thigmomorphogenesis and chloroplast restructuring are proceeding correctly.
Day 7 (Full removal): Remove the tunnel cover entirely. Leave hoops in place in case a late frost requires emergency re-covering. Transplant into final garden positions the following morning after one full uncovered night.
Adjusting for weather events
Weather in the U.S. spring is notoriously unpredictable. A cold snap during days 5–6 does not restart the protocol — it pauses it. Add one shelter day for every night below 38 °F and resume the exposure schedule when overnight lows stabilize above 40 °F. Of course, there are situations where a late-season storm forces a full retreat to the shelter phase; that is not a failure, it is the system working as intended. The tunnel's value is precisely that it makes these weather-driven adjustments quick and low-cost.
Common mistakes and how to fix them
Even experienced growers make predictable errors with hardening tunnels. The most damaging ones share a common theme: rushing the process or underestimating the physical demands the outdoor environment places on young plant tissue.
Mistake 1: opening too fast, too soon
The most common error. A warm sunny forecast on day 2 tempts growers to skip ahead. The problem is that UV intensity outdoors — even on a cloudy day — can be four to eight times higher than under typical indoor grow lights. Stomata have not yet adapted. The result is rapid leaf scorch that looks like frost damage. Fix: follow the schedule days, not the weather forecast. The forecast influences how much you ventilate within a given day; it does not justify skipping days.
Mistake 2: inadequate anchoring
A dislodged tunnel in overnight wind does three types of damage simultaneously: it exposes plants to cold they were not yet ready for, it physically damages stems and growing tips as the loose fabric whips around, and it creates a time-consuming mess at exactly the moment (early morning, pre-work) when growers have the least bandwidth. Use a minimum of two anchor points per hoop end — not one. In areas with frequent wind gusts above 25 mph, invest in purpose-built row cover clips rather than improvised sandbags.
Mistake 3: ignoring heat buildup on sunny days
Clear perforated plastic tunnels can reach 95–105 °F internally on a sunny 65 °F afternoon if not vented. That temperature will wilt and potentially kill heat-sensitive crops like lettuce or brassicas within hours. Monitoring matters here: a $12 min/max thermometer placed inside the tunnel and checked mid-morning prevents costly surprises. If internal temperature exceeds 85 °F, open both ends of the tunnel immediately regardless of the day in the protocol. For information on how structural design affects thermal management in enclosed tunnel environments, the guidance from tunnel construction and hardening methods published by the Federal Highway Administration offers useful parallel principles around ventilation planning.
Advanced techniques for commercial growers
Small-scale commercial producers — those starting 5,000 to 50,000 transplants per year — face a different set of constraints than home gardeners. Labor efficiency and schedule reliability dominate decision-making. The 2026 trend in U.S. market gardening is toward semi-automated hardening systems that reduce daily hands-on time to under five minutes per 100-foot tunnel row.
Automated ventilation systems
Thermal actuator vent openers — the same technology used in greenhouse ridge vents — can be retrofitted to low tunnel systems using a hinged end panel design. The actuator opens the end flap when internal temperature exceeds a set threshold (typically 75 °F) and closes it as temperature drops. No electricity required; the actuator cylinder expands and contracts with heat. Cost per tunnel section: $35–$55. ROI for a grower with 20+ tunnel sections: typically recovered within one growing season through reduced monitoring labor.
Integrating hardening tunnels into a succession planting system
A well-designed hardening tunnel system operates on a rotating basis: while one cohort of transplants completes the final days of exposure, the next cohort enters the shelter phase in an adjacent tunnel section. The physical structure remains in place year-round, serving as a season extension tool between hardening cycles. According to 2026 data from small-farm production consultants in the Mid-Atlantic region, producers using this permanent-tunnel rotation model extend their effective transplanting window by 3–5 weeks at both ends of the season, meaningfully increasing total revenue per acre.
Data logging and quality control
Commercial operations increasingly deploy low-cost wireless temperature and humidity loggers (brands like Govee and Inkbird, both widely available on Amazon U.S.) inside hardening tunnels to build a data record for each transplant cohort. This record serves two purposes: it enables retrospective analysis of transplant success rates versus specific environmental exposure profiles, and it provides traceability documentation increasingly requested by direct-market and CSA buyers who want evidence-based growing practices. A basic two-sensor setup costs under $40 and connects to a smartphone app for real-time alerts — a meaningful upgrade from the manual daily thermometer check for any operation handling more than 1,000 transplants per succession.
Frequently asked questions
Q: How long should a hardening tunnel be used before transplanting?
A: The standard minimum is 7 days for warm-season crops like tomatoes and peppers, and 5 days for cold-tolerant crops like kale and broccoli. Extend the protocol by one day for every night the temperature drops below 38 °F during the hardening window. Rushing this timeline is the single most common cause of transplant shock and post-transplant wilting.
Q: Can I use a hardening tunnel for seedlings in containers, not just raised beds?
A: Yes. Hoop-supported row cover can be draped over groups of containers arranged in a line or cluster. The key difference is that containers dry out faster than in-ground beds, so check soil moisture daily during the hardening period. A missed watering during heat exposure on day 5 or 6 can undo days of careful acclimation work.
Q: What is the best row cover weight for a hardening tunnel in USDA Zone 6?
A: In Zone 6, a 1.5 oz per square yard row cover is the most versatile choice. It provides 4–6 °F of frost protection for the shelter phase nights and allows 70% light transmission — sufficient for active plant growth without light-stress delay. If late spring frost risk has passed by your transplanting date, 0.9 oz cover reduces heat buildup while still providing wind and UV buffering.
Q: Do hardening tunnels work for starting seeds outdoors, or only for transplants?
A: Hardening tunnels are primarily designed for acclimating indoor-started transplants. However, they are equally effective as direct-sow germination tunnels for crops like carrots and salad greens, where they accelerate soil warming and protect emerging seedlings from birds and wind. In that use case, the tunnel stays closed for the first 10–14 days and is then managed exactly like a standard hardening protocol.
Q: How do I prevent mold and fungal issues inside a hardening tunnel?
A: Adequate airflow is the primary control measure. Never leave a tunnel fully sealed for more than 12 hours in humid conditions. Even on cold nights, cracking the end panels 2–3 inches significantly reduces humidity buildup. Remove any dead or damaged leaves from transplants before placing them in the tunnel, and avoid overhead watering in the evening. Bottom watering — using a tray-soaking method — keeps foliage dry and dramatically reduces botrytis and damping-off risk.
Wrapping up
A well-built and properly managed hardening tunnel is one of the most cost-effective tools available to U.S. growers in 2026. The material investment is low, the build time is measured in hours, and the return — in the form of stronger transplants, reduced loss rates, and extended planting windows — compounds across every growing season. Whether you are protecting a dozen tomato starts in a backyard raised bed or managing 10,000 transplants across a market garden succession plan, the core principle holds: give your seedlings a structured transition, and they will reward you with the resilience the field demands.
The hardening tunnel does not eliminate environmental stress. It sequences it. That distinction — controlled progression versus abrupt exposure — is the entire reason it works. Build one this season, track your transplant success rates, and compare them to your pre-tunnel baseline. The data, invariably, speaks for itself.
Keywords:
Inquiry
If you are interested in our products, please leave your email to receive a free product quote, thank you!
More information


Tel:
Sales E-mail: